Microsoft Sentinel All-in-One V2
Learning by doing - Getting hands on with Microsoft Sentinel FAST!
Following my previous post “Navigating the Digital Seas with Microsoft Sentinel” lets get started with point 1, “Understand Your Vessel”.
And how better to “Understand” than get HANDS ON!
Whether you're a seasoned professional aiming to enhance your skills or a curious learner eager to experiment, there's no denying that hands-on experience and experimentation is the most effective way to master new technologies. This concept is demonstrated in the recent launch of Microsoft Applied Skills, a platform that emphasizes the power of practical engagement in the learning process. Post on Microsoft Applied Skills (Coming Soon).
So you want to experiment with Microsoft Sentinel? FAST!
Starting on the journey of setting up a hands-on lab using Microsoft Sentinel's could be daunting with the huge amounts of documentation available. The All-in-One V2 Tool will supercharge your objective of having a hands on Microsoft Sentinel lab to experiment with.
This tool is a game-changer for those looking to swiftly and efficiently deploy a basic Microsoft Sentinel environment with limited Azure knowledge. Let's explore what this entails and how you can leverage the Microsoft Sentinel All-in-One V2 capabilities for an optimal experience.
Disclaimer:
While this tool is excellent for individual deployments, allowing for testing, experimentation, and swift teardowns, it's important to note its limitations in designing solutions for live, production environments. For scenarios that require thorough architectural planning and considerations (a topic we'll cover in an upcoming post), this tool might not be the ideal fit to meet such specific requirements.
Cost should also be a consideration here. (another topic we'll cover in an upcoming post).
Getting Started with Microsoft Sentinel All-in-One V2 Tool: A Step-by-Step Guide
Introduction to the Tool
Microsoft Sentinel All-in-One V2 was released in April 2023 with a whole host of new features included. Shout out and thanks to Javier Soriano Gary Bushey & team.
Previously released in 2021 by @Javier Soriano (Senior Program Manager - Microsoft), @Hesham Saad (Sr. CyberSecurity Technical Specialist - Microsoft) & @Sreedhar Ande (Program Manager - Microsoft)
This latest version is all about speed and simplicity, enabling users to set up with just a few clicks.
What’s New in Microsoft Sentinel All-in-One V2
The new iteration of this tool brings automation to the forefront, significantly reducing manual work and the potential for errors. Here's a snapshot of what the All-in-One V2 automates:
What does All-in-One do?
Microsoft Sentinel All-in-One automates the following tasks:
Creates resource group
Creates Log Analytics workspace
Installs Microsoft Sentinel on top of the workspace
Sets workspace retention, daily cap and commitment tiers if desired
Enables UEBA with the relevant identity providers (AAD and/or AD)
Enables health diagnostics for Analytics Rules, Data Connectors and Automation Rules
Installs Content Hub solutions from a predefined list in three categories: 1st party, Essentials and Training
Enables Data Connectors from this list:
Azure Active Directory (with the ability to select which data types will be ingested)
Azure Active Directory Identity Protection
Azure Activity (from current subscription)
Dynamics 365
Microsoft 365 Defender
Microsoft Defender for Cloud
Microsoft Insider Risk Management
Microsoft Power BI
Microsoft Project
Office 365
Threat Intelligence Platforms
Enables analytics rules (Scheduled and NRT) included in the selected Content Hub solutions, with the ability to filter by severity
Enables analytics rules (Scheduled and NRT) that use any of the selected Data connectors, with the ability to filter by severity
Setting Up Your Lab
Now that you're familiar with the capabilities of the All-in-One V2 Tool, let's walk through the initial setup process:
Prepare Your Environment: Prerequisites
Azure Subscription - I advised a separate Dev or Testing Subscription to ensure COST & RBAC segregation boundary’s are clear. No mistakes can then be made.
Azure user account with enough permissions to enable the desired connectors. I recommended Global Admin & Subscription Owner for simplicity as this should be in a Dev or Testing environment.
Some data connectors require the relevant licence in order to be enabled.
Launch the Tool: Access the All-in-One V2 Tool from GitHub!
Configuration: Follow the guided setup process. This will involve selecting your desired configurations, such as the retention period, data connectors, and analytics rules.
Review and Deploy: Before finalizing, review your selections. Once satisfied, deploy your setup with a click, and watch as the tool automates the complex setup process.
Deployment Details
If you are unfamiliar, with some of the items in the deployment automation prompt’s here are some recommended configurations to get you started and explanation of the options.
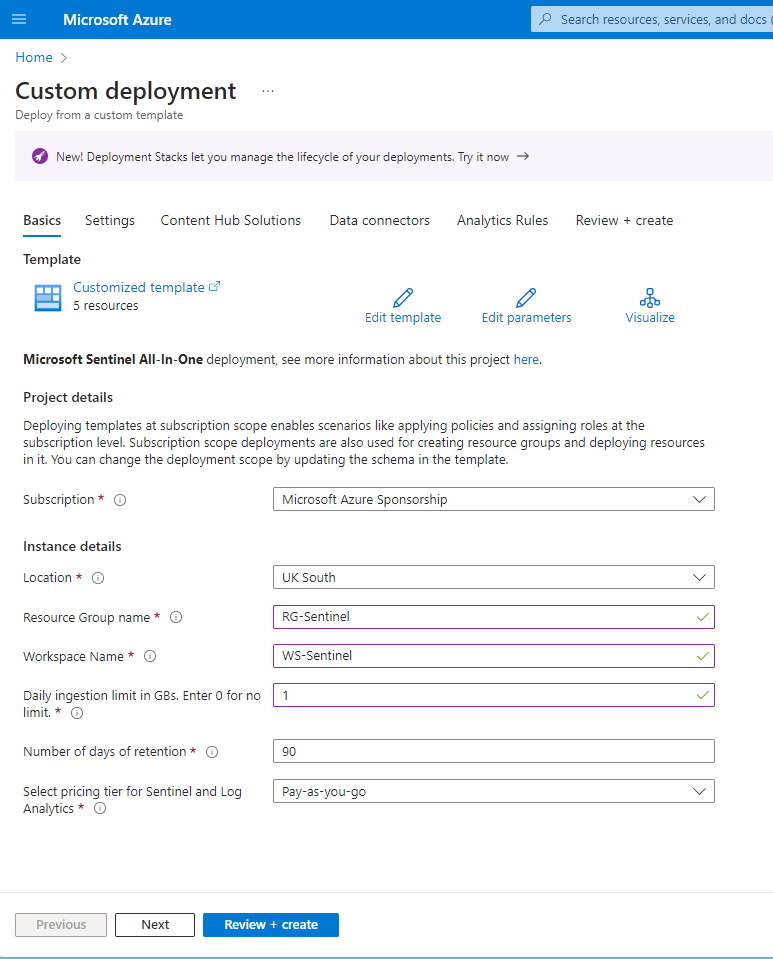
Step 1: Deploying Microsoft Sentinel All-in-One V2
Here are the settings visible in the image:
Config Option’s
Subscription: Microsoft Azure Sponsorship
Location: UK South
Resource Group name: RG-Sentinel
Workspace Name: WS-Sentinel
Daily ingestion limit in GBs: 1
Number of days of retention: 90
Select pricing tier for Sentinel and Log Analytics: Pay-as-you-go
Description of each Config Option
Subscription: The subscription option indicates under which Azure subscription the deployment will occur. This should be your Dev or Testing Subscription.
Location: The location setting refers to the Azure region where the resources will be deployed. "UK South" is one of the many regions Microsoft Azure has around the world, which ensures that the services are hosted geographically closer to the end-users or in compliance with data residency requirements.
Resource Group name: A resource group in Azure is a container that holds related resources for an Azure solution. Here, the name "RG-Sentinel" suggests that this resource group is designated for holding the resources related to Microsoft Sentinel.
Workspace Name: The LAWS (Log Analytics Work Space) workspace name "WS-Sentinel" indicates the dedicated workspace within Azure where the Sentinel instance will operate. This workspace will collect data from various sources and allow for monitoring, analysis.
Daily ingestion limit in GBs: This setting controls the volume of data in gigabytes that can be ingested daily into the workspace. It is set to 3 GBs, which means that once the data ingestion reaches this limit, additional data will not be captured an no additional cost will be incurred.
Number of days of retention: This number specifies how long the data will be retained within the workspace. In this case, it's set to 90 days (Default Free), meaning that after this period, the data will be purged unless it's archived or exported. Retention settings are important for managing costs and compliance with data retention policies. (First 90 days are free)
Select pricing tier for Sentinel and Log Analytics: Azure offers different pricing tiers for its services. See my post about costs & tiers below.
Step 2: Deploying Microsoft Sentinel All-in-One V2
Enable User Entity Behavior Analytics (UEBA): This option is checked, indicating that the UEBA feature is enabled. UEBA uses advanced analytics to identify anomalous behavior that may indicate a threat or malicious intent. It typically requires a Global Admin or Security Admin permission for setup.
Select which Identity Providers will be synchronized with UEBA: The dropdown menu is set to "Azure Active Directory," suggesting that Azure Active Directory is the identity provider chosen for synchronization with UEBA.
Please NOTE - We have NOT checked the “Active Directory” option as this would require Microsoft Defender for Identity with a Hybrid Config setup. For the purpose of a Lab I assume these are not in place.
Enable Sentinel health diagnostics?: This option is also checked. Health diagnostics can help monitor the state of Sentinel services and ensure they are functioning correctly, providing alerts and insights into the health and performance of the system.
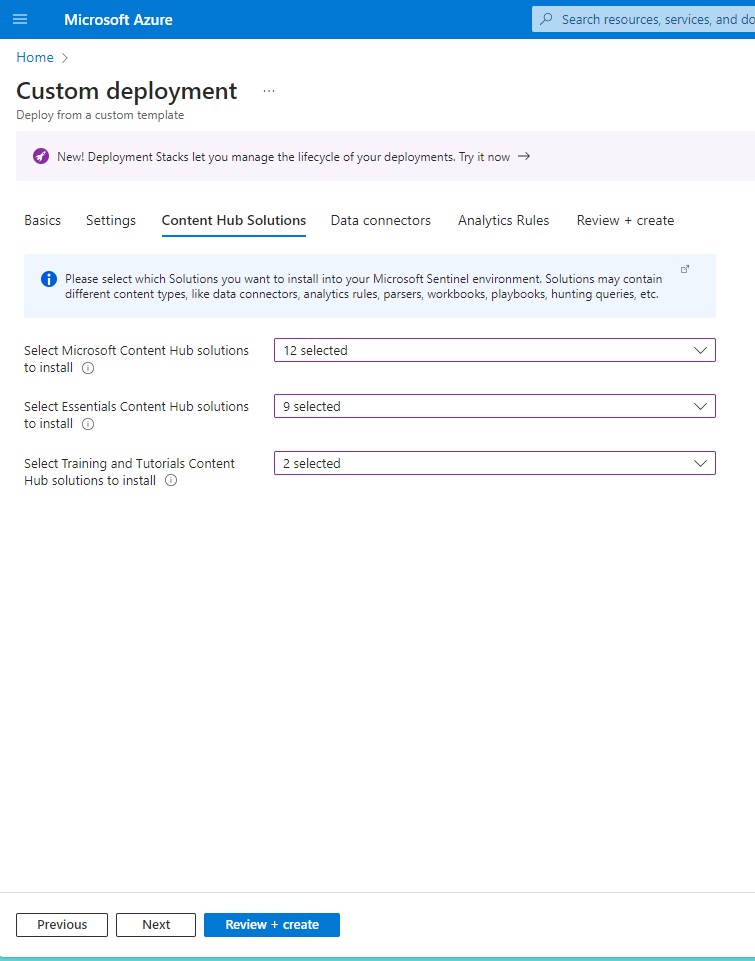
Step 3: Deploying Microsoft Sentinel All-in-One V2
Select Microsoft Content Hub solutions to install: This option shows "12 selected" (All for the purposes of demo). The Content Hub typically includes various solutions that can consist of data connectors, analytics rules, parsers, workbooks, playbooks, and hunting queries.
Select Essentials Content Hub solutions to install: (All for the purposes of demo). These essentials are great basic options to get started with Sentinel.
Select Training and Tutorials Content Hub solutions to install: This line shows "2 selected" (another topic we'll cover in an upcoming post).
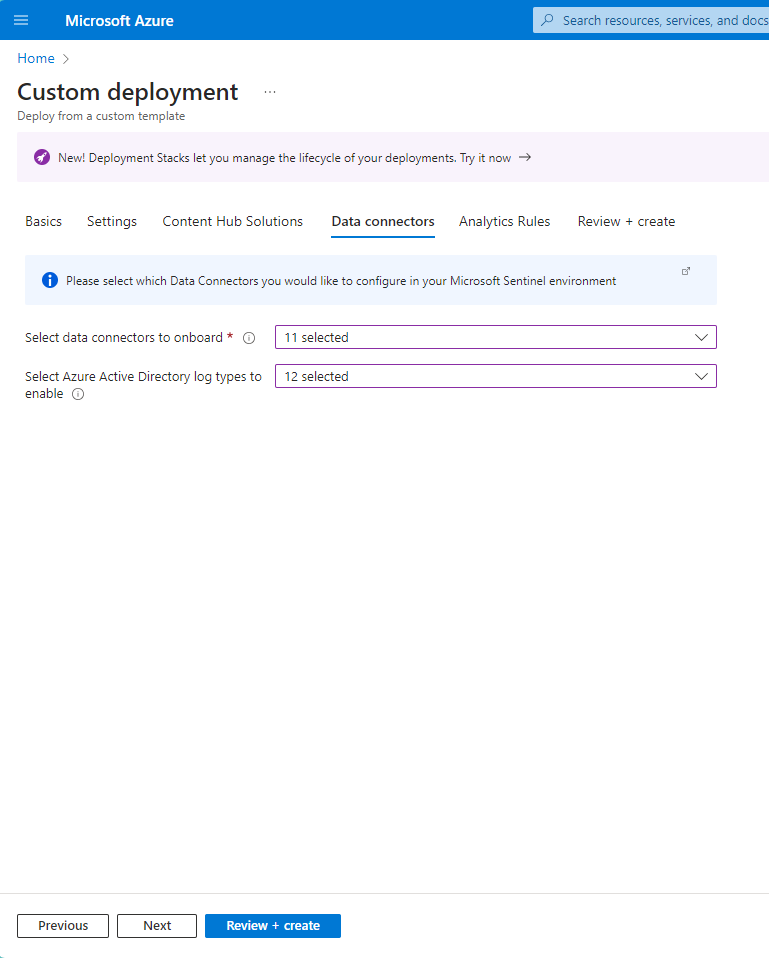
Step 4: Deploying Microsoft Sentinel All-in-One V2
Select data connectors to onboard: Data connectors are used to collect data from various sources like cloud services, on-premises servers, and other applications.
Select Azure Active Directory log types to enable: These log types could include sign-in logs, audit logs, and other activity reports that are important for security and compliance.
Step 5: Deploying Microsoft Sentinel All-in-One V2
Enable Scheduled alert rules for selected Content Hub solutions and Data Connectors: This checkbox is marked, indicating that scheduled alert rules for the chosen Content Hub solutions and Data Connectors are to be activated. Scheduled alert rules are typically used to run queries at specific intervals and generate alerts based on their results.
Select the severity of the rules to enable: There are four severity levels chosen:
High
Medium
Low
Informational
This selection means that analytics rules of all listed severities are intended to be enabled. These severities reflect the importance and potential impact of the alerts that will be generated, allowing users to prioritize and respond accordingly. This is a crucial part of setting up a SIEM system, as it helps in distinguishing between the different levels of threats and informational events.
Step 6: Deploying Microsoft Sentinel All-in-One V2
Review and create.
Complete : Deploying Microsoft Sentinel All-in-One V2 Deployment.
Post-Deployment Checks: After deployment, it's crucial to perform checks to ensure everything is functioning as expected. This includes verifying data flow, rule activations, and connector health.
Explore and Customize: Once your basic setup is complete, dive into the various features and experiment, This might involve customizing analytics rules or exploring additional data connectors.
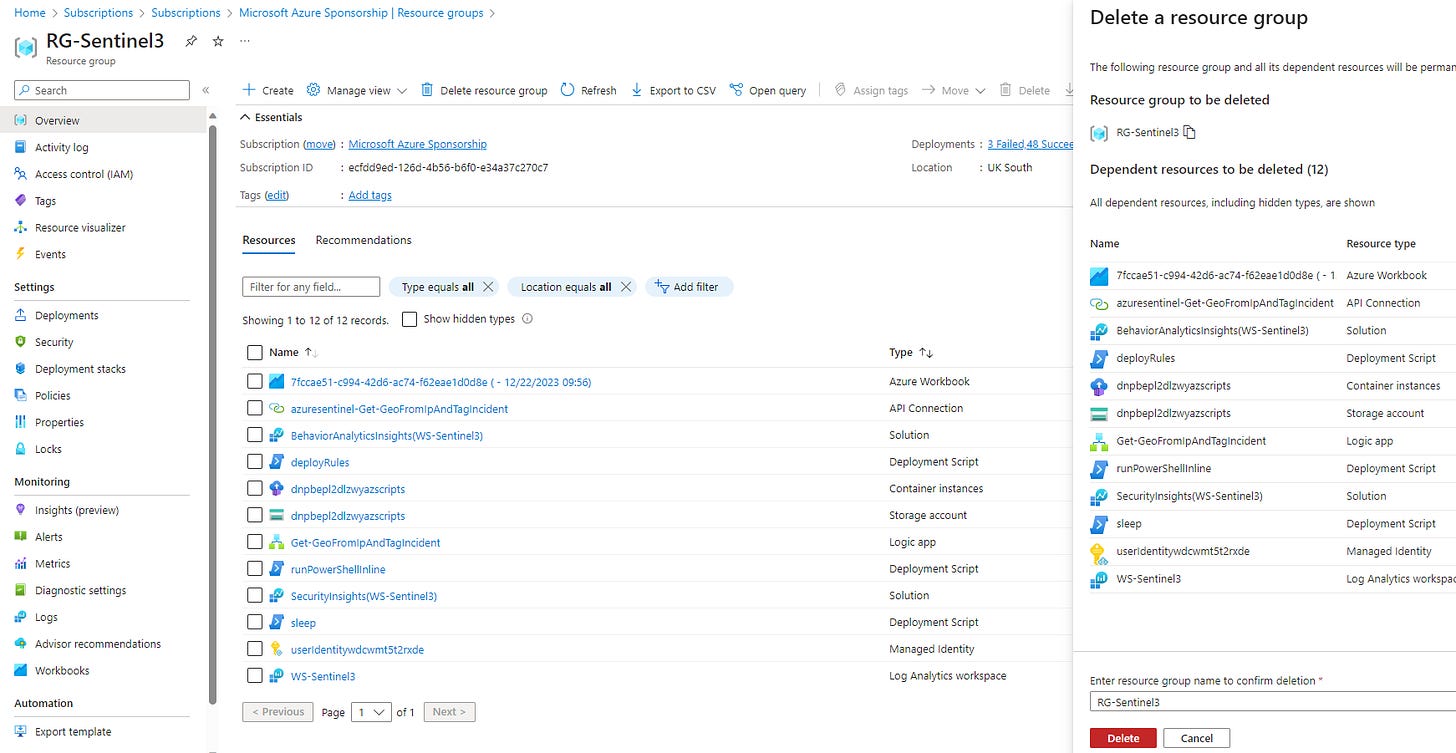
Tear Down: Simple - delete the Resource group that the instance has been deployed in!
Conclusion
The Microsoft Sentinel All-in-One V2 Tool represents a significant advancement in simplifying the deployment of a comprehensive cybersecurity environment. By automating critical steps and offering a user-friendly interface, it empowers users to focus more on lab work rather than setup complexities. Whether you're a seasoned cybersecurity professional or new to the field, this tool offers a streamlined path to getting hands on with a Microsoft Sentinel environment.
More Learning resources?
See my recommended resources page.
Looking for something more complex?
Lets talk about Azure DevOps & Deploying Microsoft Sentinel via Infrastructure as Code (IAC) & managing content artifacts & instances via Workspace Manager and Repositories. (all topic’s we'll cover in an upcoming post’s)
#MicrosoftSecurity
#MicrosoftLearn
#MicrosoftDefenderXDR
#MicrosoftSentinel
#CyberSecurity


Great solution 👍